iOS Accessibility Guide for Developers
There are some simple steps you can take to make your iOS app friendly to the visually impaired users. All you need is to provide more meaningful labels and iOS VoiceOver will take care of it.
I am guilty that I didn’t take these simple steps whenever I release a new app, even though I know about it since iOS 3.. Sometimes, I need a reminder.
Treat this post as another reminder. And as a guide.
Test with Accessibility Inspector
In iOS Simulator (NOT actual device), go to Settings > General > Accessibility and switch it on.
You may now observe accessibility information for each UI element.
Define in Interface Builder
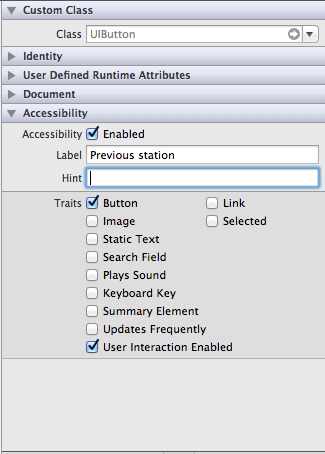
If you are using IB to build your UI, you can easily edit from the Identity Inspector. All UIView comes with accessibility attributes.

- Enable Accessibility
- Enter a label. This is what will be read with VoiceOver.
- Enter a hint, if the label could be ambiguous.
Change Programmatically
You can also change the label and hint programmatically.
If you have a UILabel, it will read the text of the label. However if that is not descriptive, you could
mylabel.accessibilityLabel = @"Play the music";
mylabel.accessibilityHint = @"Play the music right now";
UITableViewCell
It is most likely a table view cell is made up of a couple of UI elements. However, it would be difficult to select the individual elements.
Hence you could help be aggregating the labels and set the UITableCellView accessibility options.
UISlider
For slider, you may also want to set the value.
mySlider.accessibilityValue = @"Volume at 50%";
Test on Device
Go to Settings > General > Accessibility > Enable VoiceOver.
Test it out!
Advanced
I have merely list the simple steps I usually used.
Apple has it’s own complete guide on how you should approach the topic, including custom views and UIAccessibilityPostNotification. Matt Gemmell also covers the topic.
Hope you be a hero!